Saturday, May 7, 2011

DIY Filter Sock Mount

Until today, my filter sock had been resting on a glass baffle. It worked, but was not ideal. I have a Berlin Sump filter sock mount around here somewhere, but unfortunately it didn't work with my sump. After a discussion with the Mr. R. Reef (Credit where credit is due), I was inspired to make a DIY egg crate filter sock holder.

Yes, I used hot pink zip ties. It makes it more scene.

Sock holder, sans sock.

This is how the sock will sit.

I used two small strips of egg crate to create a lip that will keep the sock above water level

Sock holder to the left

Snap shot of the DIY sock holder in my DIY sump.

Someone wouldn't stay out of the shot...

Tada! My filter sock is now supported above the water level. Water is now forced to flow through the sock, not over the sock. I installed (placed) the holder inside my sump. The sock is positioned close enough above the water and low enough from the edge of the sump to prevent any overflows if the filter sock becomes clogged. Yes!

Cost of the project: $0 dollars for supplies as I had everything here from previous projects. If I had to purchase the items new, cost would be under $10 (AquaMaxx filter sock not included in price).

Labor Hours: 15-20 minutes total. (including pictures).

Until next time, friends...

Thursday, May 5, 2011

VorTech MP10w ES

The quest to build my 60-gallon reef tank continues! As time progresses, I have made a mental wish list of upgrades awnd add-ons. An area that needed an urgent upgrade was water flow. Detritus was accumulating on top of and behind the rock work, and using only one power head was not providing sufficient flo.

There are many great options for water flow for every need and budget, but I wanted something controllable and powerful. I narrowed down my choices, and after weighing my options, I decided on the Ecotech Marine VorTech MP10w ES Propeller Pump. Well, not just one, I chose two.


The VorTech MP10w ES is simple and sleek. It is designed for aquariums from 2.5 – 50 gallons and has a flow rate of 200 to 1575 gallons per hour. A MP10 can accommodate aquarium glass up to 3/8 inch. (Is your tank larger, or glass thicker? No problem! Ecotech offers the MP40 (for aquariums 50-500 gallons) and the MP60 (120-1000+gallons). There’s a VorTech pump for everyone.)
Vortech pumps now are available in a "wireless" configuration. The wireless designation can cause confusion; there are still wires. The wireless aspect refers to the driver's ability to find other wireless units and sync the pumps. This allows for more than one pump to run the same operational mode.


MP-10w Specifications:
Flow: 200 to 1575 gph (750 -5962 lph)
Power Consumption: 8 to 18 watts
Maximum Tank Thickness: 3/8″ (9.5mm)
Appropriate Tank Size Range: 2.5 to 50 gal (9.5 -190L)
Dimensions: Wet Side- 2.5″ diameter by 1.5″ long (63.5mm x 38.1mm),
Dry Side – 2.5″ diameter by 2″ long (63.5mm x 50.8mm)
Clearance Needed Behind Aquarium: 2.25″ (57mm)


The pump build reflects quality, and Ecotech Marine backs their product with a 1 year warranty. The pump includes everything you need to completely install your Vortech. The kit includes cable mounts (and zip ties) and even Velcro to attach the driver to your stand.


The Vortech pump was easy to install. The directions included are easy to follow for setup, however I recommend downloading a copy of the full user guide when it comes to programming. The full user guide is also simple to follow, but goes into step-by-step instructions. I found these instructions were helpful for first time programming.

Step one: Open The box. Inspect the contents. Drool… Okay, don’t drool… You don’t want to damage the driver or the dry side.

Step two: Clean any algae from the mounting service. You may also want to clean the outside of the glass (tip: use RO/DI water and some paper towels).

Step three: Apply the rubber gasket (not needed for 1/4” or 3/8” glass) and cord mounting tabs.


Step four: Place the VorTech motor upon the black gasket (if used) and secure the cord using the mounting tab. Per the Quick Start Guide, “The cord must be positioned upwards so that if the VorTech were to fall off the aquarium, it does not swing and damage your aquarium or pump.”
Step five: Attach the wet side. I used the included foam pre filers. 


Step six: Mount the driver unit wherever desired.


Step seven: Plug everything in. Turn on to constant mode and turn speed control know to maximum. You can check alignment at this time. Move the wet side slightly (up, down, left, right) to minimize vibration.

Step eight: Choose desired operational modes. Set desired programming. For this step, I would recommend using the user manual: it goes into more detail. If you are using more than one pump, you will need to sync your wireless drivers, and designate master and slave pumps before selecting modes.


Step nine: Grab a tasty beverage and enjoy the work of art that is your aquarium. You may now safely drool.

Monday, April 18, 2011

Some Progress

I'll try to keep it short. I have been relatively busy with midterms and school, so I haven't had time to really do much with the aquarium aside of maintenance. Here are some current pictures.

I still need more base rock as I rushed into the move. I feel that the rock work and coral are very random, and not necessarily in a good way.

I have added new tank inhabitants since I first set up the aquarium including a Percula Clownfish, ORA Yellow Line Goby, ORA Pink & Green Damicornis, Green Toadstool Leather (donated by Mr. RemsReef.com himself), Purple Montipora (from my BFFFFFFFFF), and an ORA Maxima Clam (under 2.5"). All is doing well except the Maxima Clam who didn't make it (FAIL).

A picture speaks at least one word, so "read" on below...


View from the left side.


View from the center: Someone is hungry... or trying to communicate with me.


AND... View from the right side.

Friday, April 15, 2011

How Much Turnover Per Hour?


How much "Turnover per hour?" - A question many hobbyists ponder. While we tend to focus on hard numbers, this video from Marine Depot's Video Series featuring Julian Sprung provides a more practical answer. I hope you enjoy.

Also, don't fret. I will post a personal aquarium update soon.

Tuesday, April 5, 2011

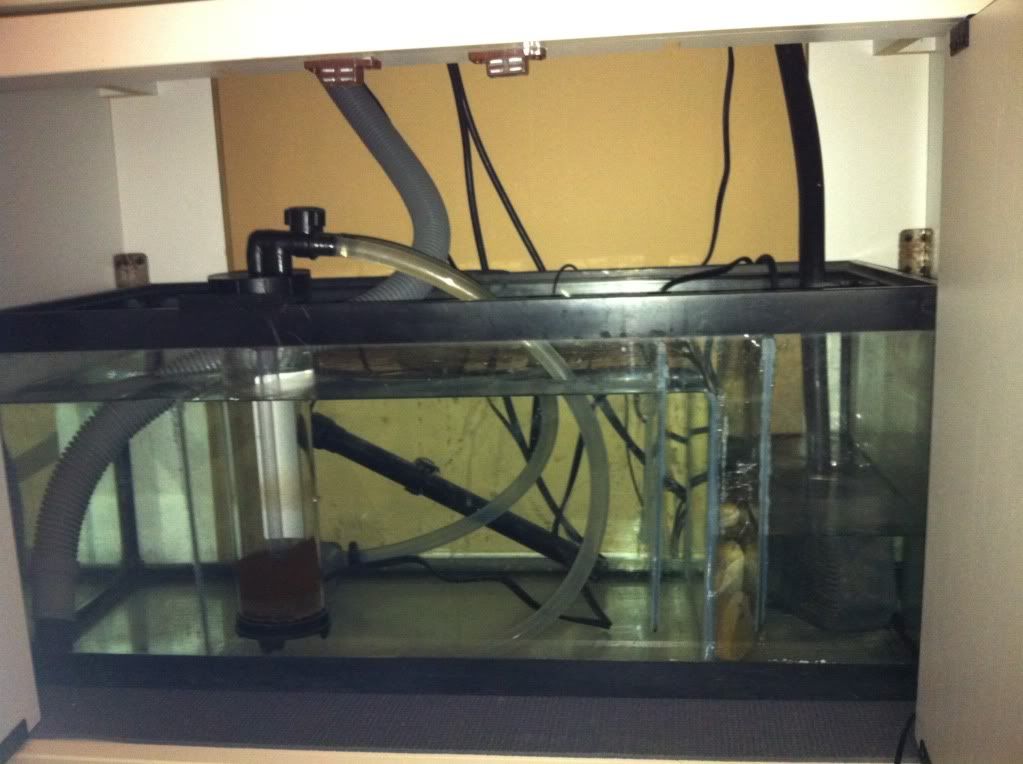
My DIY Sump

I installed my DIY 20 gallon long sump. Using a design from RemsReef.com as inspiration, I decided to try my hand at my first DIY (do it yourself) sump / glass project. My final product has some areas of opportunity, but so far, so good. There were no leaks from the baffles or aquarium, and the sump is doing its job well. I won't post detailed information on how I built it; if you want to see a professional make a DIY sump, I suggest www.RemsReef.com! He did a great job with his sump, and it came out looking very clean.

Anyways, here's my sump in action. I am very pleased that there is no annoying waterfall noise. I also have a large skimmer chamber to hold an internal protein skimmer down the road. The skimmer chamber is followed by 3 glass baffles that act as a bubble trap, hopefully reducing (possibly eliminating) micro bubbles from entering the display tank. Check out the picture below!


DIY SUMP

Friday, April 1, 2011

Julian Sprung - Two Little Fishies

It was a normal day like any other when I heard that Julian Sprung from Two Little Fishies was coming in today to visit. He was brought over to our work area, but I missed the introduction as I was on the phone. I mentioned how cool I thought it would be to meet him, and my boss brought me over to introduce us. I listened to the interview he was giving for Marine Depot (will be posted to Marine Depot's YouTube Channel), and it was definitely an educational experience listening to him describe his line of products and their proper use.

I brought two books he wrote, and we asked him to sign them. He very nicely autographed and signed my books, and he even drew a Clownfish for me. Julian was also nice enough to pose for a few photos. He was a very nice and brilliant man, and it was very cool meeting him. I posted some photos of the signatures below.

Make sure you check out everything and anything from Julian Sprung and Two Little Fishies! You can see the interview with Julian Sprung at: www.youtube.com/MarineDepotVideos.


PhotobucketPhotobucket